When I have several photos to use in my blog, I place them side-by-side and sometimes in multiple rows. Not long ago, I posted these snow scene photos on my blog.
These photos are in one table of three rows with two photos per row. If you think of a spreadsheet, the photos are like the data in each cell of the spreadsheet.
Here is the same code, only instead of photos, I typed text "photo n" for each cell. I put a border around these cells to emphasize the table. The border is an option with the table tag. In other words, this is how you create a text table in html!
| photo 1 | photo 2 |
| photo 3 | photo 4 |
| photo 5 | photo 6 |
 |  |
 |  |
 |  |
These photos were first uploaded to Picasa instead of directly into Blogger. I wanted to use the "medium 400px" size that is available in Picasa.
 There are three html tags that I used, as shown in the tag definition box. I defined ONE table, THREE rows (tr), and TWO photos (td) per row.
The coding is nested. The table is the largest element, so it is the outer wrapper. The rows wrap the data. Wherever you see a "/" in the tag, that is the end tag.
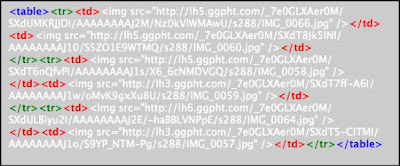
In the next box, you'll see that the code runs together. Because Blogger adds a hard "return" at the end of a sentence, the code has to wrap. This makes it difficult to read. It takes getting used to, but after you've done this a few times, the coding will not be that difficult.
This is the actual code for the snow scene photos.

If you write your code and the photos are not aligned, then you may have to delete blank spaces between every tag.
As you get comfortable with using tables to align photos, you can try different size photos as I did when posting three photos in a group for a recent Garden Inspiration story.
Here is a link to my favorite html table resource. I hope this is helpful.
Photos and instructions by Freda Cameron
No comments:
Post a Comment